Submit NFIP Cancellation Request: Difference between revisions
No edit summary |
No edit summary |
||
| Line 33: | Line 33: | ||
|style = padding-top: 1em | |style = padding-top: 1em | ||
|file = Img-proc-cxl-02.png | |file = Img-proc-cxl-02.png | ||
|size = | |size = 400px | ||
|caption = The NFIP Policy Cancellation page | |caption = The NFIP Policy Cancellation page | ||
}} | }} | ||
{{Box task | {{Box task | ||
|image = Img-proc-cxl-03.png | |image = Img-proc-cxl-03.png | ||
|size = | |size = 400px | ||
|caption = Choose the appropriate qualifying reason from the dropdown list | |caption = Choose the appropriate qualifying reason from the dropdown list | ||
|text = | |text = | ||
Revision as of 11:00, 6 March 2025
This procedure explains how agents can submit a cancellation request for an NFIP policy.
This will not auto-issue and must be reviewed by Underwriting before it is cancelled. |
Procedural Steps
1. Access Policy Record

Open the Policy Record
To start the policy cancellation process
- Find the Policy Actions block on the right
- Choose "Cancel Policy"
2. Choose Qualifying Reason
This will open the NFIP Policy Cancellation page.
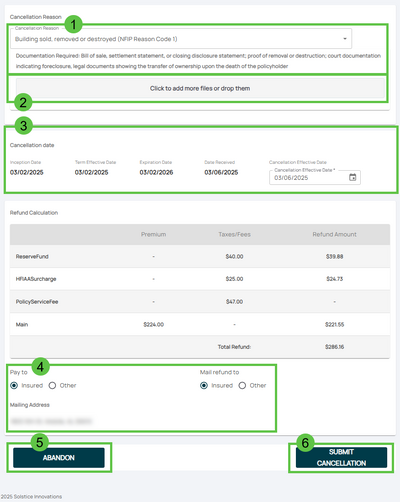

Choose the appropriate qualifying reason from the dropdown list


The NFIP Qualifying Cancellation Reasons are listed from the top based on how common they are
- The Reason Codes are used for reporting to FEMA
- The cancellation effective date will change based on the Qualifying Reason
- The Reason Code can be changed after submitting the request to Underwriting
3. Attach Supporting Documentation
Upload any required documentation, such as:
- NFIP Cancellation/Nullification Request form signed by the policyholder
- Proof of sale, duplicate coverage, or other applicable evidence
4. Review and Submit
* Review the entered information for accuracy and completeness.
- Submit the cancellation request through the Equinox platform for processing.